Do you need ideas on what to paint on a black canvas? These are some great paintings to get your creative juices flowing.
Disclaimer: THIS POST MAY CONTAIN AFFILIATE LINKS, MEANING I GET A COMMISSION IF YOU DECIDE TO MAKE A PURCHASE THROUGH MY LINKS, AT NO COST TO YOU. AS AN AMAZON AFFILIATE I EARN FROM QUALIFYING PURCHASES.

Painting on a black canvas is a new and exciting experience for many people. However, deciding what to paint on a black canvas can be difficult. I love black and white paintings, so whenever I have a hankering to do one I often go for a black canvas. Grab your paint supplies and let’s get painting!
You are going to learn about what to paint on a black canvas, painting on black canvas with acrylics, black and white painting, black canvas art, black canvas paintings, the benefits of black canvas, and more!
After learning about the benefits of a black canvas and 5 examples of black canvas paintings you will be ready to tackle your own black canvas art!
Benefits of Black Canvas
The best thing about a black canvas is how easy it is to cover mistakes or to start over. A few months ago I started a galaxy painting in color on a canvas I had painted black. After working on it for a while I realized that I hated how it looked and no matter how much I tried to fix it nothing made it look better. So instead of having to put a bunch of layers of white to cover it up or throw out the canvas I simply painted black over it.
Bright colors pop on with black canvas art. The dark background has a way of making colors look different. White also pops more on a black canvas making highlights and reflections more meaningful.
Black canvases are similarly priced to white canvases. If you don’t want to go out and buy one, you can always paint a white one black and let it dry before starting your painting. This is the way I have always done it because I have canvases I need to use. But if you want to do a lot of paintings on black canvases it might be worth saving your black paint and buying a pack of them.
Painting on Black Canvas with Acrylics
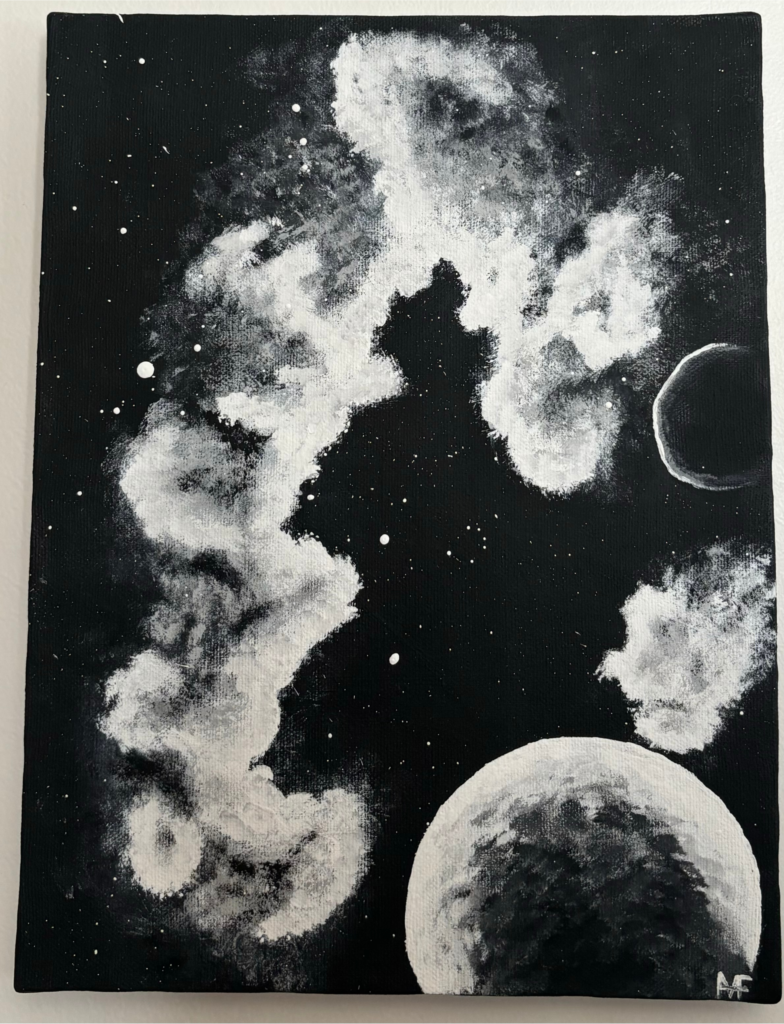
Supplies needed: canvas (this one is 8×10 inches), black and white acrylic paint, and brushes.
A nice galaxy scene is always a good choice for black canvas art for beginners. It is easy, simple, and fun to do.
Planets
One hack for making circles is using the bottoms of cups to trace. Remember that the circle will be slightly larger than the cup.
With the smaller planet create a thin outline of white and then blend the white along the edge to create a glowing effect. If you spread the white too far into the middle take some black to fix it.
For the larger planet, you want to have more detail on it. To make it look like it has craters apply white paint onto your brush and then dab the surface of the canvas. You want to edges of the planet to be the whitest so right after you apply white paint onto your brush start dabbing towards the outside of the planet and then work your way towards the middle.
While the white paint is still wet, use black paint and do the same thing but start from the middle and work your way outwards. You will want the black and white paint to mix to make gray while on the canvas. But don’t focus on making it mix. It will do it naturally if both colors are wet. The dabbing technique will make the craters on the surface of the planet.
Clouds
Use the same dabbing technique with the clouds. Apply the most paint where you want the clouds to be the brightest first. After you have the shape, use the same brush but don’t get any more paint on it. Use the paint left on the brush and already on the canvas to make the wispiness of the clouds by dabbing.
You will want to use a small amount of black paint for areas that have too much white. But always work your way from the background into the cloud. In other words, when using black paint work from black to white, and when using white paint work from white to black.
You can add shadows in the clouds with black, but do it while the white paint is still wet so the colors mix well.
At the end, you can use splatter white paint to create stars.
Black Canvas Art
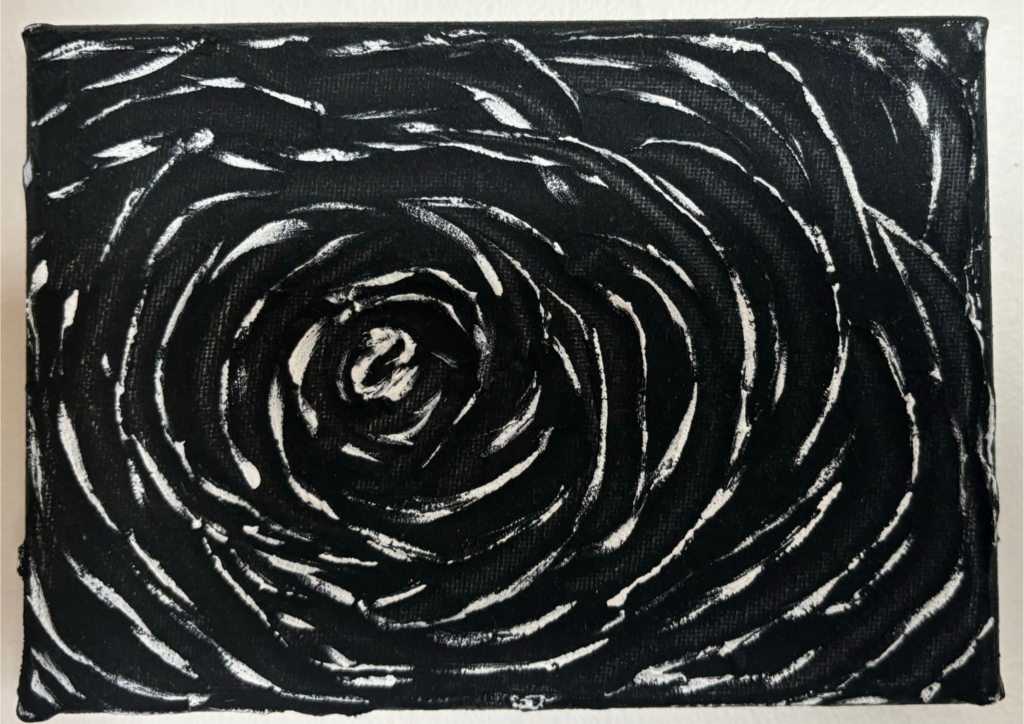
Supplies needed: canvas (4×5 inches), black and white acrylic paint, palette knife, brush, and baking soda.
Start by mixing black acrylic paint with baking soda. Error on the side of mixing less than you think because you can always mix more.
If this is your first time using a palette knife or textured paint I suggest using a smaller canvas to get the feel of it. You will be using the bottom of the knife to get the paint and squish it onto the canvas.
The idea of this black canvas art is to create a rose. In the middle of the flower, you will want the paint more condensed and the petals smaller. As you make your way outwards make the petals larger by squishing the paint more.
The petals of the flower above are pretty small and there are a lot of them. If you don’t want as many just space out the petals.
Use a brush with white acrylic paint to paint the ridges of the petals.
Black and White Painting
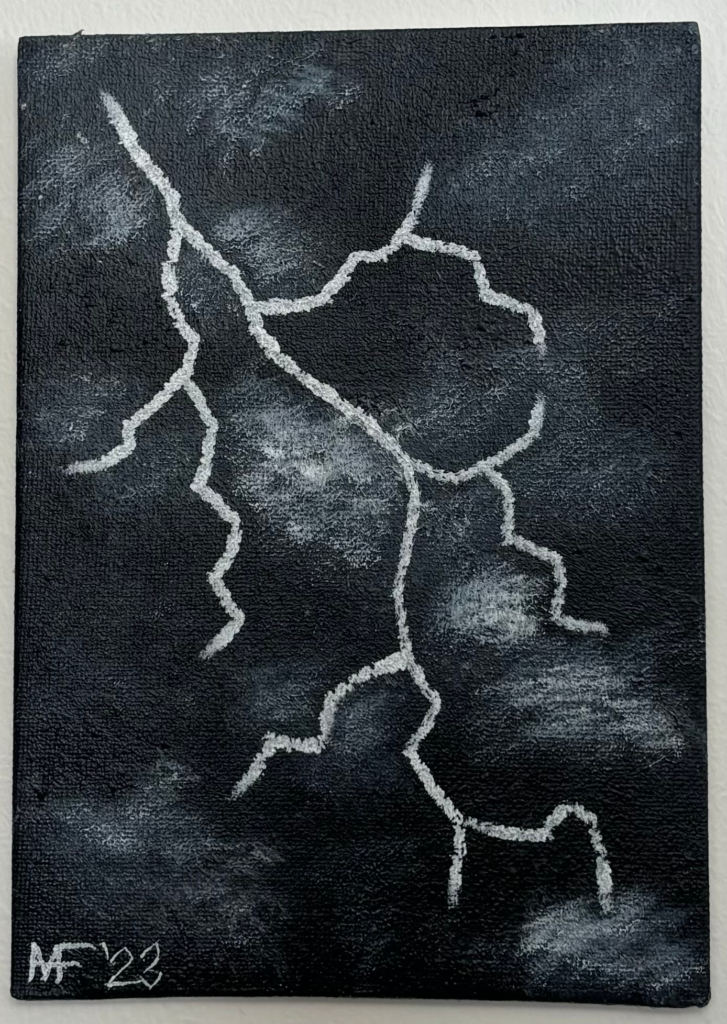
Supplies needed: canvas (4×5 inches), black and white paint, and brushes.
This painting was done using oil paint, however you can use acrylic paint as well.
This painting is perfect for beginners. It doesn’t take a lot of time because there are two steps: background clouds and the lightning bolt.
First, paint the background with the clouds. You can use the same technique you used for the first painting shown in the post: dabbing. Make the clouds as dense and bright as you like before adding the lightning bolt.
Second, paint the lightning bolt. Do this by applying white paint on the edge of a straight brush. Then tap the straight edge onto the canvas. Don’t swipe the brush just tap to create the straight and jagged lines.
That’s it! Two steps and you have a stunning black and white painting of a lightning bolt.
Want to learn more about oil painting? Check out this post on oil painting background:
Black Canvas Paintings
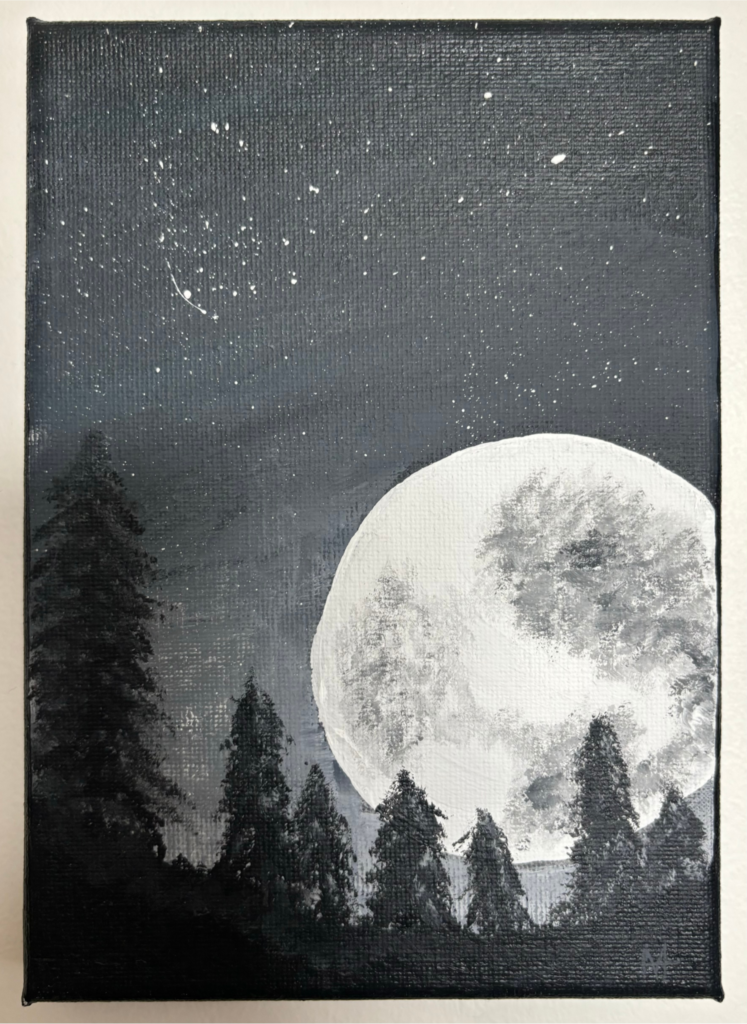
Supplies needed: canvas (4×5 inches), black and white acrylic paint, and brushes.
Learn how to paint this dazzling black canvas paintings!
Night Sky
To paint the night sky apply black paint starting at the top of the canvas until 3/4ths of the way down. Add white paint at the bottom and mix it upwards into the black. If you want the night sky to be darker, wash your brush off then starting at the top, work your way down by brushing side to side. If you want the sky to be light move the white paint upwards in the same fashion.
Once you have the sky how you want it, splatter some white paint to add stars.
Moon
You will want the background to dry completely. Luckily for you, acrylic paint dries quickly so you shouldn’t have to wait long.
For the moon, paint a white circle. You can use the cup trick to get a perfect circle or freehand it.
While the white paint is still wet, apply a small amount of black paint onto a brush. Use the dabbing technique to add craters. You don’t need craters on the entire surface of the moon, leave some white surfaces.
Land and Trees
Make sure the moon is dry.
Using black add the mountain top making the highest point on the opposite side of the moon. This will help the composition be appealing.
To paint trees I like to use a flat brush, apply paint on the tip, and then dab the canvas. You can also use a fan brush, although with small trees I find a fan brush difficult to control.
Paint the trees black and then add highlights on the branches using white or mixing paint to make gray. Apply the highlights the same way you painted the trees, but don’t do it on every branch. In this case less is more.
Black and White Flowers

Supplies needed: canvas (12×24 inches), black and white acrylic paint, and brushes.
Originally my vision for this painting was to have 2-4 tulips coming from the bottom right corner. However, I didn’t like how that looked so I modified my vision to add tulips to two more corners.
What I learned from this and what I hope you will learn from my experience, is that a painting is a work in progress. At times you may need to change your original plan to create the masterpiece it was meant to be.
Tips to use before you start painting:
- Decide where the light source is coming from. If you do this at the very beginning you will know where the highlights and shadows should be for each tulip, stem, and leaf no matter what corner you are working on.
- If you decide to do bunches of flowers in multiple corners paint each corner individually. When you paint the top corner, physically turn the canvas upside down so you are painting the flowers normally. It will save you a lot of heartache and confusion if you do it that way.
- This painting can be trickier and take longer than the other ones in this post. Don’t get discouraged though. The final black and white painting is so worth the time and effort you put into it.
Stems and Leaves
Paint the stems and leaves in white first before adding any accents. Every tulip should have one stem, but not all stems need a leaf.
You will want the stems to be smooth lines, with no sharp bending. Pay attention to where the stem comes from and goes to when placing it behind a flower, stem, and/or leaf. Even though you don’t want the audience to be able to tell what stem goes to what flower easily, they should be able to trace each stem to its flower.
Vary the length of each stem and flower. If you have them all the same height you will have a difficult time getting each corner to interact with each other.
Tips when painting the stems and leaves:
- Use the same gray used for the flowers to paint the shadows. If you use black for the shadows they will blend into the black background and you don’t want that. Now if you decide to not use gray for the flowers, do the shadows while the stems and leaves are wet so when you apply the black it will mix and create gray so you can distinguish it from the background.
- Intertwine the stems between corners. One of the fun things about this painting is you can’t easily see where each flower comes from. This is because they are all tangled together from flowers coming out of different corners.
Flowers
These black and white flowers were painted in gray created by mixing black and white acrylic paint together. One consequence (good or bad) is that if you don’t mix enough paint to paint every flower the gray may be slightly different with each mixing. If you didn’t want to use gray for the tulips, using white and then black for the accents would also look very pretty.
Tips when painting the flowers:
- Don’t think too hard while painting them. I found the more I thought about each petal and stroke I placed on the canvas the worse the flower turned out. As soon as I began to have fun with it and relax the tulips turned out better.
- Each flower is unique. That is the way it is in nature and that is the way it is with your painting.
- Accents go a long way. Don’t overwork the accents. Use them to distinguish petals, but don’t overdo it.
Reflection
Use these questions to reflect on the painting on black canvas with acrylics that you did:
i. What do you like most about it?
ii. What do you like least about it?
iii. What would you do differently next time?
iv. How have you improved since your last piece?
When you take the time to study your artwork you will discover ways to improve. Don’t skip over this step of the process. You will get better if you take the time to learn from your art.
Thank you for learning what to paint on a black canvas. I would love to see what dazzling painting you created 🙂
More posts you will enjoy:


Leave a Reply