Ever wonder how artists paint a watercolor landscape? Here are 5 simple steps to paint your own landscape using watercolor.
Disclaimer: THIS POST MAY CONTAIN AFFILIATE LINKS, MEANING I GET A COMMISSION IF YOU DECIDE TO MAKE A PURCHASE THROUGH MY LINKS, AT NO COST TO YOU. AS AN AMAZON AFFILIATE I EARN FROM QUALIFYING PURCHASES.

Painting a watercolor landscape can be intimidating, but it doesn’t have to be. After doing many myself these are the tried and true steps I use when painting a landscape in watercolor.
You will learn about picking a reference photo, sketching, painting a watercolor sky, finding the painting’s background, middle, and foreground, and signatures.
After learning about the 5 steps you will have the tools to paint your own masterpiece.
This post is all about how to paint a watercolor landscape.
Supplies needed:
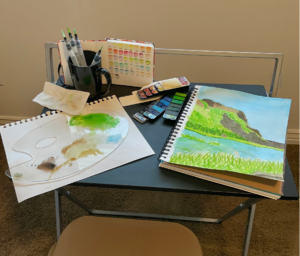
The supplies I use are a paint palette, Mr. Pen watercolor brushes, Artme Watercolor paint, Grumbacher watercolor paper, a watercolor sketchbook, a cup of water, and a paper towel.
How to Paint a Watercolor Landscape in 5 Easy Steps
1. Pick a Reference Photo
You will want to pick a reference photo that makes you excited to paint. Nothing is harder than trying to finish a painting you aren’t interested in.
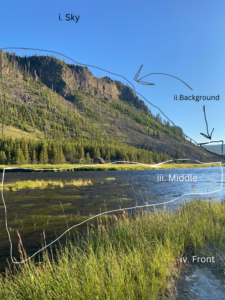
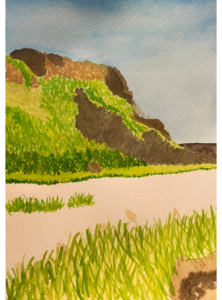
The first place to find inspiration is your photo library. Whenever you are out and about look for things that you would like to paint and then capture them in a picture. For this exercise, I found a landscape photo I took on a river bank in Yellowstone National Park.

When choosing a reference photo look for a landscape that isn’t complicated. The one above has 5 components to it: the sky, the mountain range far in the background, the nearer mountain, the river, and the grassy river bank in the front. This will make it easier to sketch your painting.
Another simplicity is that there are three main colors: blue, green, and brown. This will be helpful because if you mix up too much paint you can use it to create a different shade to paint another area in the watercolor landscape.
Although this reference photo may seem simple, it does have a lot of details that you could paint if you chose to.
2. Sketch
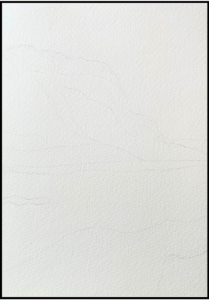
Lightly sketching in each layer will make it easier to know where to paint. These lines must be very light with a pencil. Most watercolor paint will allow you to erase the pencil marks after the paint is completely dried, but if your lines are too dark you will still be able to see them through the paint.
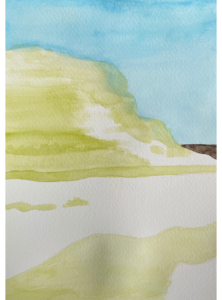
I have done landscapes where I haven’t sketched it out beforehand and it still turned out well. The thing I have noticed, and the reason I sketch out the majority of all of my paintings, is it is easy to forget where things go when painting if you don’t have guidelines. Take this painting I did for example:


I didn’t sketch this painting out. Because of that, the size of the mountains is off from the reference photo, which makes the sky come down too far and the foreground not large enough. If I were to paint this one again I would sketch out the sky, each mountain, the trees/foliage in the valley, and the foreground so I could see the placement of them before I start painting.
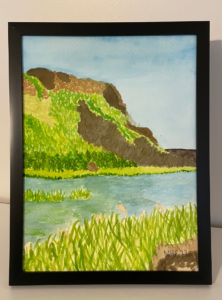
It is much easier to erase or paint over pencil than to try to move things around after they have been put down with watercolor. Below is the sketch I did of this landscape. Even with filters to lighten the paper and darken the pencil, it is still hard to see. Sketch as lightly as you can.
3. Watercolor Painting
This step is broken down even further to simplify the painting process. With most paintings, including watercolor landscapes, it is best if you start from the furthest section and work your way forward. It makes it much easier to layer the paint.
i. Watercolor Sky
The sky in the reference photo is pure blue, not a cloud in the sky. The watercolor paper adds texture to the paint, but so do your brushstrokes and other techniques. If your sky doesn’t come out looking as smooth and monochrome that is okay. If you have areas of the sky more concentrated with color it gives the illusion of clouds.

Make note of how the blue sky gets lighter until it’s almost white where the furthest mountain range is. This photo was taken at twilight so the sun was low in the sky, not quite setting. To capture that time of day you will want to have the blue color more concentrated at the top of the painting and have it be nearly white at the bottom of the sky.
ii. Watercolor Background
Make sure your sky is dry before you start this next step. This is important because you don’t want the sky bleeding into the mountain or the mountain bleeding into the sky. If you want crisp lines in your watercolor background either let the paint dry naturally or make it dry with a blow dryer.
Start painting the furthest section of the background which is the back mountain range. You will want this to dry as well before you paint the closer mountain range since the distance between them is great.
The mountains have spots of light and dark thanks to the near-setting sun. Unlike other mediums, with watercolor light colors won’t show up on dark colors. It will be tempting to paint the mountain in a light shade of brown and then add layers to make the shadows. Instead, try painting them in light green then gradually add the darker shades in. This ensures that the light areas will be visible and the additional layers will add depth to the painting.

iii. Middle
The middle of this picture is the river. There are many different colors within the river water which is a lot of fun to paint. Since you want the colors to meld together don’t let the paint dry completely until you are done with the river. This is called the wet-on-wet technique. On the right-hand side of the river, I used the extra blue that I had from the sky then I would mix blue-green colors into it.
There’s also moss underneath the water around the reeds in the middle of the river. To get the mossy effect paint patches of green first and let it dry most of the way. Then paint the water over the top of the moss to give the illusion of it being underwater. If you mix multiple colors into the river, without blending them completely, it will add depth to the water.

Would you like to learn more about the wet-on-wet technique? Check out this article:
iv. Foreground
Ideally, you wouldn’t paint the foreground until the very last. However, since they had similar colors, I painted them at the same time so I could use the colors I had mixed. The grass and reeds that overlap into the river are a lighter color than the blue/green of the water so they would need to be painted before the river to be seen.
You will want to carefully paint around the reeds when painting the water.
4. Decide if it needs changing
Now that you’ve finished it, take a step back and look at it. What do you like? What don’t you like? What can you do to fix it?
5. Sign it!
Signing a painting signifies that it is complete. While my grandma taught me to paint she told me that the signature is the most important part because it is your stamp of approval. There is power in taking ownership of what you have created. It signals that you are done with this project and can move on to the next one.
There are many ways you can sign a painting: full name in cursive, first initial then full last name or vice versa, a unique symbol, etc. I like to sign my artwork with my initials and the year I completed it.
Typically these are done in a corner of the lower part of the painting, but it doesn’t really matter where you sign it.
Reflection
At the end of every project take time to notice how you have improved, what you would do differently next time, and your favorite part of the painting.
i. What do you like most about it?
ii. What don’t you like least about it?
iii. What would you do differently next time?
iv. How have you improved since your last piece?
During this painting, I was able to mix colors to create one that was closer to the picture color. In the past, I would pick a color from my paint palette that was closest to what I needed. However, by mixing colors I was able to get much closer to the color that I wanted.
Next time I want to focus on getting a better sketch of the landscape. I thought I had done a good job at the time but once I started painting the shadows on the mountain I realized that the rocky part at the top needed to come down further on the mountain.
My favorite part of this piece is the river. It was fun to mix blues and greens to make the differing colors of the river.
Let me know how your painting turned out and what you learned 😊
This post is all about how to paint a watercolor landscape.
Looking for more step-by-step paintings? Check out this other post: