Are you planning on doing a travel journal for your upcoming vacation? Don’t just limit it to tickets, boarding passes, and receipts; add your artwork to it as well! Read below for the best tips for an art travel journal.
Disclaimer: THIS POST MAY CONTAIN AFFILIATE LINKS, MEANING I GET A COMMISSION IF YOU DECIDE TO MAKE A PURCHASE THROUGH MY LINKS, AT NO COST TO YOU. AS AN AMAZON AFFILIATE I EARN FROM QUALIFYING PURCHASES AT NO EXTRA COST TO YOU.

Going on vacation is extremely exciting, and if you’re anything like me, you want to remember as much of it as you possibly can. Along with photos, selfies, and souvenirs, create an art travel journal to record memories. I have been doing this for the past couple years and swear by it. It does take some planning ahead of time, but with these tips it makes it super easy and convenient.
You will learn about what an art travel journal is, how to create one, what supplies are essential, plein air art tips, travel painting, taking reference photo pictures for future paintings, and more!
After learning about all of these art travel journal tips, you will be able to create a memory book that you will cherish forever.
Table of Contents
How to do an Art Travel Journal
What is an Art Travel Journal?
You may have seen the trend in travel journals: where you tape bus tickets, boarding passes, receipts, photos, etc. in a journal as a type of scrapbook of your vacation. An art travel journal is even more fun because you get to create the pictures inside.
You can do a straight art travel journal where you only add paintings, drawings, and sketches of your trips in your journal, or you can do a combination of the two, and add pages of things you tape into the journal along with your artwork.
I’m all for combining the two, but let’s be real, once I’m back from my vacation, I’m not gonna be able to focus on it. So, I’ll just put all my energy into the art journal and see what I can come up with then.
What do I Need to Bring for Travel Painting?
When there are so many other things you need to shove into your suitcase, it’s hard to slip in art materials. Which is especially when you aren’t checking any luggage (often my husband and I only bring a personal item so I have to pack meticulously). So what do you NEED to bring?
First decide what medium(s) you want to work with. Anything that takes time to dry, or special care, or lots of equipment is not what you are looking for. So this removes the option of oil and acrylic paints.
Drawing materials (charcoal, ink, oil pastels pencils, pencils) are the easiest medium to work with when traveling. Travel cases for drawing material are affordable and often come with a sketchbook. I love my Norberg & Linden drawing set, which I bring with me whenever I travel.
Note: If you are bringing your art materials in a carry-on/personal item, make sure that nothing could be seen as a weapon. I made the mistake of not taking out my brass drawing compass and it got confiscated.
Watercolor is more difficult than drawing, but very doable. Instead of bringing my professional grade watercolor paints, I bring a much smaller travel set and I don’t have to worry about getting them dirty (Artsy Watercolor Travel Paints). You will need a watercolor paper journal. (Once again, the quality of the paper is not as good, but these travel paintings are to have fun and relax). I have a small one (Cute Watercolor Sketchbook) and a larger one (Artist’s Loft Watercolor Sketchbook).
Drawing Packing List
- Sketchbook
- Drawing Travel Set: includes graphite pencils, erasers, sharpeners, charcoal pencils, blending sticks
- Pencil Oil Pastels (optional: switch out some of the graphite pencils for oil pastel pencils)
Watercolor Packing List
- Watercolor Sketchbook
- Watercolor Travel Paints
- 2-3 Paper Towels (or you can use a beach towel if already bringing one)
- Plastic Water Bottle (it’s leak proof and you can get rid of it after you’re done with it)
- Drawing Travel Set (optional)
Learn how to paint when you don’t have a lot of space in How to Paint in a Dorm Room in 9 Easy Steps.

What do I Paint in my Art Travel Journal?
The obvious answer to what to paint is anything and everything that you want to. Be on the look out for anything that draws your attention. Flowers, old buildings, roads, abandoned railroads, the ocean, a sign, a group of trees, clouds, etc. When in a new environment, there are many things that look fascinating. Pick the things that you want to remember most and create them on the page.
The next step is finding a place to sit and paint/draw the object or scene. Drawing/painting from real life is called plein air. Plein air art can be difficult because things in the world are in constant motion. The wind, waves, trees, people, and animals. So this is a perfect time to practice being loose and quick with your sketches. Get the overall shapes onto the page and then you can add color and details slowly.
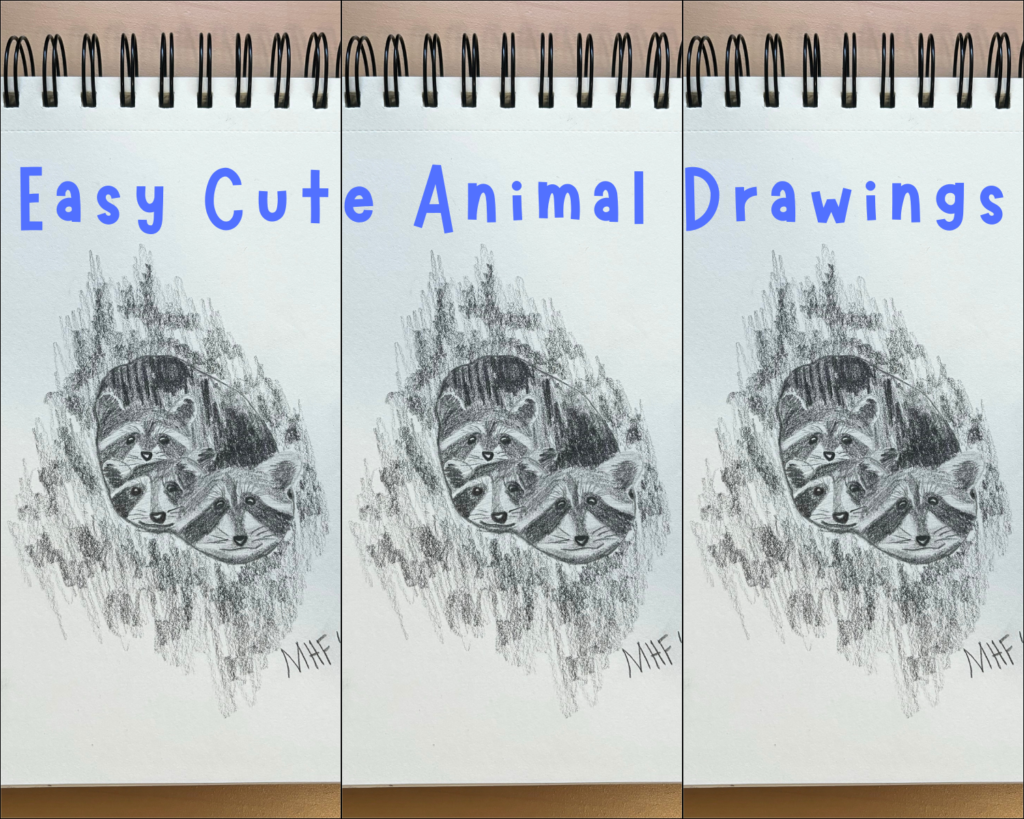
Learn how to draw in the Beginner’s Guide: Easy Cute Animal Drawings.
The beach is a prime location for plein air drawing because you see the overall shapes (horizon line, mountains) don’t move. The challenge is capturing the sky, clouds, and waves since they are constantly in motion.
Watercolor Ocean Painting

Charcoal Pencil Drawing

The artwork on the left is a simple watercolor painting that focuses on colors in the ocean waves. The charcoal drawing on the right has more detail and you can see the stark difference in the clouds. When I started drawing this, the sky was overcast in the distance but when I was done, it was sunny with blue skies. This is where you use your memory, imagination, and artistic judgement to decide what you want the final product to look like.
Another example in my travel journal is this watercolor of a sign at the Airbnb we stayed at.

None of these paintings took more than an hour. The more often you do this, the better at it you will get. Which will not only serve as a memory book, but also proof of your improvement!
So go out of your comfort zone and capture something that you would never have attempted to do before. If it turns out funny looking, no harm done because it will just be another memory made.
Practice your en plein air skills by following the guide in 5 Cool Trees Sketch.

How do I Take Good Reference Photos for Future Paintings?
Why would you even want to take reference photos if you are painting in your journal? Well, you don’t have all of your art materials, so you may want to paint something, but you want to do it in oils, or be able to frame it. Plus reference photos make good vacation photos.
The number one thing you can do to up your reference photo game is to remember the rule of thirds. The rule of thirds is where you break the image into 9 equal squares and have landmarks land along those lines or intersections. Landmarks include the horizon line, buildings, mountains, people, and more.
Look at the difference between essentially the same photo, but when it’s composed with the rule of thirds:


This is a trick that professional photographers use and that you should be using in your artwork as well. It makes the photo look more balanced and pleasing to the eye.
There is an easy way to do this by adding the grid function onto your iPhone’s camera.

- Go into settings.
- Click on Camera.
- Turn on Grid and Level
- When you take photos, align the grid and ensure the level is not broken. (The level is very faint in this photo, but is circled in yellow).
Go on a Vacation!
Now all you need to do is go on a vacation and relax with your sketchbook and watercolors 🙂
This post is packed with awesome tips and tricks for creating art while traveling, especially in a travel journal.
Other posts you will enjoy:
17 Great Still Life Drawing Ideas

Top 15+ Gifts for Artists Who Draw

13+ Creative Drawing Ideas Easy
50 Simple Watercolor Painting Ideas


Leave a Reply